Create a timelapse from GoPro images with FFmpeg and save it with
MJPEG video encoding.
cd some/directory/with/gopro/images
ffmpeg -r 6 -f image2 -pattern_type glob -i '*.JPG' -s 4000x3000 -c:v mjpeg -q:v 10 ./the-timelapse-video.mov
cd some/directory/with/gopro/images - The command will work in current directory.-r 6 – 6 fps.-pattern_type glob -i '*.JPG' – Every JPG in current directory.-s 4000x3000 – Using GoPro's original still image resolution for the output video.-c:v mjpeg – MJPEG video codec.-q:v 10 – Quality 10. Use 2-31. 2 is highest quality.
See FFmpeg documentation for reference.
Now drag this video into a video editing software to make post editing.
Use git push to deploy your code, and nvm
to use seperate node versions per project.
Prerequisites
- A Ubuntu server with Upstart (Ubuntu 16, etc).
- A user for the project. This user will be called
myproject in
the examples below.
- SSH access to this user.
- nvm installed on
the
myproject user account.
- An
.nvmrc file in your project.
Step 1. Setup in the user account
SSH in as myproject
ssh myproject@myserver.com
Create the bare git repo that you will push to for deployment.
mkdir ~/myproject.git
cd ~/myproject.git
git init --bare
nano hooks/post-receive
Paste the script below.
#!/bin/bash

set -e

export NVM_DIR="$HOME/.nvm"
. "$NVM_DIR/nvm.sh"

NEW_DIR="$HOME/app/`date +%Y-%m-%d-%H.%M.%S`"
CURRENT_DIR=$HOME/app/current
REPO_DIR="$HOME/app/repo"
GIT_DIR="$HOME/myproject.git"

mkdir -p $REPO_DIR

git --work-tree="$REPO_DIR" --git-dir="$GIT_DIR" checkout -f
git --work-tree="$REPO_DIR" checkout-index -a --prefix="$NEW_DIR/"

cd "$NEW_DIR" && nvm i && npm i --production

rm -f "$CURRENT_DIR"
ln -s "$NEW_DIR" "$CURRENT_DIR"

sudo restart myproject
What's happening:
- Initiate environment.
- Config variables.
- Make a copy of the project to a new directory.
- Build the project.
- Relink to the latest version and restart the service.
Now set execute rights on the script.
chmod u+x hooks/post-receive
Step 2. Setup as root
Switch to root.
sudo su -
Create the service description file by editing /etc/init/myproject.conf.
start on runlevel [2345]

env LANG=en_US.UTF-8
env PORT=7777

setuid myproject
setgid myproject

respawn
chdir /home/myproject/app/current

script
  NODE_VERSION=`cat /home/myproject/app/current/.nvmrc`
  exec /home/myproject/.nvm/versions/node/v$NODE_VERSION/bin/node .
end script
- What runlevel this service will start on.
- Environment variables.
- What user and group id we will run as.
- Make sure the service respawns automatically if it crashes.
cd into the latest deployment and start with the
correct version of Node.
Add visudo entry with command visudo and add this to the bottom.
myproject ALL=NOPASSWD: /sbin/restart myproject, /sbin/start myproject, /sbin/stop myproject
Step 3. Test deployment
On you local machine, add the remote and push to it. prod in the example
below is the name of the deployment environment, prod is short for produciton.
git remote add prod myproject@myserver.com:myproject.git
git push prod master
Note: The first time it will fail to restart the service
because it isn't running. I recommend that you uncomment that line
the first time.
Possible improvements
- Check if service is running, restart it otherwise start it.
You are missing ZURB-Foundation. Install it with
gem install zurb-foundation
If you've set up your iPhone/iPad to sync calendars with Google Apps over Exchange, but are not getting all calendars, there's one thing more you need to do.
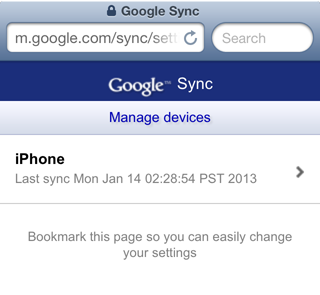
Go to https://m.google.com/sync/settings/ on your iPhone/iPad and log in with your Apps credentials. Make sure you set the language to English.
Click on your device in the list, select the calendars you want to sync and then hit Save.
Now restart your iPhone/iPad, and it should start syncing all calendars.
This is quickly solved in 3 steps:
Open up Settings and then Messages. Switch iMessage off and then on again. While you are here, check what phone number and addresses you have setup with iMessage, under Send & Receive.


